Well, it appears that I am not so good at updating my journal everyday so I shall update it weekly. it seems easier to do it that way!
March 12th.
Are you happy?
Yes.
March 13th.
How much "me" time did you take today?
All day! I'm not working and my husband is out of town so I spent the whole day doing what I want!
March 14th.
List 3 things you have faith in.
My abilities, my morals, humanity
March 15th.
Who is the last person you said "I love you" to?
My husband.
March 16th.
Did you seize any opprotunities?
I like to think that I always seize them. I moved to Mexico with almost zero notice, now I am observing classes even though I am not being paid simply to familiarize myself with the job.
March 17th.
Where did you go today?
Well... today so far I have gone from my bedroom to the living room, kitchen, bathroom.... Haven't left the house yet. I may go to parroquia for coffee shortly.
Saturday, March 17, 2012
Tuesday, March 13, 2012
3 weeks delayed on posting this....
On February 23rd I got to go and see Enrique Iglesias for the closing of the Carnaval in Veracruz. It was greatness. I've always enjoyed his music but now I have respect for him as an entertainer. He honestly looks like he loves what he is doing and that energy radiates throught the crowd. I wish I had the money to go see him again in Mexico City. I would gladly pay money to see his show, it's fun, energetic and crazy!


Sunday, March 11, 2012
5 year journal
March 11th.
What did you find inspiring today?
http://es.scribd.com/doc/49994116/wallpockets-complete making your own wall pockets. I shall make these!
What did you find inspiring today?
http://es.scribd.com/doc/49994116/wallpockets-complete making your own wall pockets. I shall make these!
Recipe: Coconut Banana Bread
I LOVE banana bread to the point that I buy bananas just to let them go mushy so I can make banana bread... I have actually yelled at my husband for eating bananas... and since moving to Mexico I have become obsessed with coconut so this recipe made me drool.
Recipe inspiration from My Kitchen Addiction (HEAVILY modified based on what I had on hand)
(Makes 1 mediumish loaf and 6 muffins, or 1 large loaf)
Ingredients:
1/4 cup vegetable oil
1/4 cup unsweetened applesauce
scant 1/2 cup sugar
2 eggs (or 4 egg whites if watching cholesterol)
1 tsp vanilla extract
2 cups flour (can use 1 cup of whole wheat flour if you want)
1/2 cup okara (remember that from the soymilk recipe??), or add 1/2 cup more flour
1 1/2 teaspoons baking powder
1 teaspoon baking soda
1/2 teaspoon salt
3 medium overripe bananas, mashed (about 1 cup)
1 cup coconut milk
1 cup sweetened flaked coconut (or shredded coconut)
Pam to spray the pans with
Tools needed:
2 mixing bowls
Fork
Electric mixer (optional)
Measuring cups/spoons
Loaf pan/muffin tray


Get all your stuff together. I left out one mixing bowl in the pictures... oops!

If you are using Okara blend it until it's smooth and the consistancy of flour.

Mix all your dry ingredients. Flour, Okara, Salt, Baking powder, Baking soda and coconut.

In a seperate bowl mix the oil, sugar and applesauce.

Add in the eggs and mix well.

Add in your 3 bannas and coconut milk and either smash well with a fork or...

cheat and use a mixer like me.

the finished liquid mixture will look something like this.

Add in your dry ingredients and mix to combine. It will be a nice runny mixture.

Spray the pans you'll be using with Pam and then pour the mixture in. Either fill the loaf pan 3/4 full, fill about 12 muffin cups 3/4 of the way or do what I did and do one loaf pan filled 1/2 way and 1 tray of muffins.

Almost done!!! They will be done when a toothpick comes out clean.

If you made 1/2 muffins and 1/2 loaf the muffins will be done sooner so pay attention. Mine took 35 minutes.

Cooling on the rack smelling oh so yummy!!

I don't know about you but I can't wait for muffins to cool so I dug in. Put some real butter (non of that low cal, fake stuff for me!) on it and dig in!

The loaf was done after about 1 hour

Amazingly delicious. They turned out insanely moist and rich. Next time I may leave out the sugar altogether because they are fairly sweet.
So to recap:
1. mix dry ingredients in one bowl
2. mix wet ingredients in another bowl, making sure to smash the banana well
3. mix it all together
4. Pour into pre-sprayed pans
5. Bake until a toothpick comes out clean.
6. EAT!
Saturday, March 10, 2012
5 year journal
So I saw this idea for a 5 year journal on pintrest a while back and thought it would be a pretty neat thing to try. It gives you a question each day and you simply answer the question, then repeat the following year, on the same page so you can see the changes and turns your life has made. I know I'm starting a tad late but here we go for March 2012.
March 1st.
The funniest thing you've heard today.
I actually said "The ocean is wet" today while my hubby and I were at the beach..
March 2nd.
If you could have a new talent what would you have and why?
I would want to learn languages with ease... cuz I live in Mexico and suck at Spanish.
March 3rd.
Who other than your spouse is your best friend?
I honestly don't know... I have lots of amazing close friends but at this point I can't chose one best friend.
March 4th.
What do you wish you had left unsaid?
That sounds an awful lot like what do you regret saying and I chose to not have regrets in life. Everything happens for a reason, even things that I say which are stupid have a reason.
March 5th.
What is the first thing you ate or drank today?
Well I had a cup of black tea with 1 frozen strawberry in it and 1/2 a cup of low fat cottage cheese.
March 6th.
Are you saving or spending?
Oh how I wish I were saving but unfortunatly until I start working we are spending.
March 7th.
On a scale of 1-10 how clean is your house?
Right now I'd say about a 7. There is laundry that needs to be done and I should dust but other than that it's pretty neat actually!
March 8th.
What is the last song you listened to?
Maryla Rodowicz- Ale to juz bylow
March 9th.
What relaxes you?
Reading, music, cooking, my pets
March 10th.
What is the most valuable thing you own?
In terms of use my laptop, in terms of money spent... my kitchen
And that is the first 10 days. Now the goal is to update this everyday. And then to do it for 5 years....
Friday, March 9, 2012
Recipes: Beans from dry to cooked in 75 minutes!
I love beans. Green, black, kidney, soy. I love 'em. Always have. When I lived at home with my parents we had an awesome veggie garden every year and I remember being 10 or so getting hungry in the middle of the night, grabbing a flashlight and going to pick green beans from the stalk and cooking them up as a snack. Once my mom woke up and caught me outside in my nighty picking them and she just started to laugh. She asked me what kind of kid I was sneaking out to pick and cook beans at 3am when we had chips and cookies in the cupboards. I just shrugged and said I wanted beans, while chomping on a carrot I had just picked and rinsed off with the hose outside.
Now I don't have a garden and it makes me sad. I plan on starting a little rooftop garden as soon as I can afford it but for now I'm stuck with buying my veggies in a store. :(
Today I really wanted black beans. I have a variety of dried beans in my cabinets so I grabbed a container and cooked them up as a quick snack. Now you may be saying to yourself "dried beans, quick snack? that's not possible!" I assure you it is!
Ingredients:
some sort of dried beans in any amount you want (I used black this time)
Salt (optional)
any other seasoning you may want (optional)
water
tools:
Loaf pan
tinfoil
oven
 Here's everything you need to make awesome cooked beans in 75 minutes!
 dump the beans into the loaf pan, add your salt and seasonings ( if using) and cover it all with water. I use a 3:1 ratio. 3 cups water to 1 cup beans and it seems to work well for me.


Now when I make these beans I usually make a lot and keep them in the fridge for other meals during the week. Tonight for example I am making myself chicken fajitas. I steam a chicken breast, chop up some lettuce, tomato, and avocado, throw everything into a tortilla, top it with beans, add some salsa and sour cream and dig in. it's an awesome easy dinner.
Or you can top your salad with cold beans
add to a rice dish to make dirty rice
add meat too your cooking beans to make a frank and beans dish but healthier
Use the beans as a side instead of pasta or potato
eat them plain as a snack like i do....
Now I don't have a garden and it makes me sad. I plan on starting a little rooftop garden as soon as I can afford it but for now I'm stuck with buying my veggies in a store. :(
Today I really wanted black beans. I have a variety of dried beans in my cabinets so I grabbed a container and cooked them up as a quick snack. Now you may be saying to yourself "dried beans, quick snack? that's not possible!" I assure you it is!
Ingredients:
some sort of dried beans in any amount you want (I used black this time)
Salt (optional)
any other seasoning you may want (optional)
water
tools:
Loaf pan
tinfoil
oven


Cover the pan with tinfoil tightly! The point is to keep the steam in the pan so make sure you wrap the loaf pan nice and tight. Put it in the oven at about 350 degrees or so (standard baking temp) for 60-75 minutes. Check after 1 hour but be careful not to tear the foil because if it's not done then you need to wrap it up again. After the 1 hour mark, if the water is gone but the beans are still too tough, feel free to add more water, re wrap and leave it in the oven for a bit more time.

Now when I make these beans I usually make a lot and keep them in the fridge for other meals during the week. Tonight for example I am making myself chicken fajitas. I steam a chicken breast, chop up some lettuce, tomato, and avocado, throw everything into a tortilla, top it with beans, add some salsa and sour cream and dig in. it's an awesome easy dinner.
Or you can top your salad with cold beans
add to a rice dish to make dirty rice
add meat too your cooking beans to make a frank and beans dish but healthier
Use the beans as a side instead of pasta or potato
eat them plain as a snack like i do....
Monday, March 5, 2012
Recipe: Slow cooker lazy cabbage rolls
I'm Polish so I love me some cabbage rolls. I also love my slow cooker. I am very lazy. So when I found the words "Lazy slow cooker cabbage rolls" I screamed a little bit....
Ingredients:
1/4-1/2 a head of cabbage
1lb of ground meat (any kind)
2-3 cups of tomato sauce
dried herbs, salt, pepper (optional)
1.5 cups brown rice
1-2 cups water
Tools needed:
Crockpot
Cutting board
Sharp knife
Frying pan
 All the stuff gathered together waiting to become yumminess!
 Brown the ground meat. I used chicken this time but you can use beef, pork or turkey if you so desire. Moms regular cabbage rolls contain a mixture of ground beef and pork.
 Chop, shred, cube, or leave the cabbage in leaves, it's really up to you. I chose to corsely chop the cabbage this time. Put a layer of cabbage on the bottom of the slow cooker. However much you want... I put lots because I really love cabbage.
 Pour between 1/2 and 1 cup of uncooked brown rice ontop of the cabbage.
 Spread half of the ground meat over the rice and cabbage and then repeat the layers ending with some cabbage on top.
 If you are using plain tomato sauce add whatever herbs and seasonings you would like. I added pepper, basil, thyme, oregano and parsely this time. If you are using a seasoned spaghetti sauce then just pour it right over everything. Add about 2 cups of water over the tomato sauce. Do not stir!
 Put the lid on the slow cooker, turn it on high and leave it there for 2.5-3.5 hours.

Once all the water is absorbed and everything is nicely cooked DIG IN!
 If the tomato sauce is too acidic for you you can always add a spoon or sour cream or some whipping cream into the slow cooker.
This is awesome and so much easier than regular cabbage rolls!!!
Ingredients:
1/4-1/2 a head of cabbage
1lb of ground meat (any kind)
2-3 cups of tomato sauce
dried herbs, salt, pepper (optional)
1.5 cups brown rice
1-2 cups water
Tools needed:
Crockpot
Cutting board
Sharp knife
Frying pan


Once all the water is absorbed and everything is nicely cooked DIG IN!

This is awesome and so much easier than regular cabbage rolls!!!
Recipe: Coffee Mug Crumble Cake
Crumble cake in a mug.... done in a microwave.... in less than 5 minutes....YES! So good!
I must say I love pintrest.com. The recipes on there are A MA ZING! no joke, I'm in love with that site. My waist does not like the site so much....
Anywho crumble cake in a mug.....
Ingredients:
1/4-1/2 an egg
2 tbsp butter, divided
1/8 tsp baking powder
1/4 cup flour
Cinnamon
2tbsp sugar
2 tbsp sour cream
a couple drops of vanilla
 Here is all you need to make cake!
 Throw a tablespoon of butter into the bottom of the cup. Soften it a little bit in the microwave.
 Add 2 tablespoons of sugar and cream together.
 If you want a more cakey cake add half an egg, if you want it more crumbly don't add any egg. Play around see what works for you. Personally I prefer no egg.
 Add 2 tablespoons of sour cream. Stir to combine.
 Add in a few drops of vanilla, some cinnamon and whatever other spices you want (I added nutmeg and cloves). 1/8 tsp of baking powder and 1/4 cup of flour to the cup and mix well.
 To make the crumble topping mix 1 tablespoon of butter, 2 tablespoons of flour, 1 tablepoon of sugar and some cinnamon in a seperate container and smash up with your fingers until crumbly.
 Crumble the topping on top of the cake mix in the cup.
 Put it in the microwave for 1-2 minutes. Start with 1 minute and then add 10 seconds at a time until it's done
 Carefully remove the mug from the microwave, it will be very hot. Let it sit for a moment to cool down and then dig in!!
You can do all sorts of variations to this recipe....
Add orange flavoring
coffee flavor
some liquor
chocolate chips
Peanut butter
Really the options are endless!
Enjoy!
I must say I love pintrest.com. The recipes on there are A MA ZING! no joke, I'm in love with that site. My waist does not like the site so much....
Anywho crumble cake in a mug.....
Ingredients:
1/4-1/2 an egg
2 tbsp butter, divided
1/8 tsp baking powder
1/4 cup flour
Cinnamon
2tbsp sugar
2 tbsp sour cream
a couple drops of vanilla


You can do all sorts of variations to this recipe....
Add orange flavoring
coffee flavor
some liquor
chocolate chips
Peanut butter
Really the options are endless!
Enjoy!
Sunday, March 4, 2012
Recipe: Homemade Soymilk and Okara
I love soymilk but here in Mexico it's insanely expensive so I've started making my own. It's yummy and free of preservatives and chemicals.
Ingredients:
1 Cup dried non GMO, organic soy beans
Water
Tools needed:
Pot
Strainer
clean but old dish towel or pillow case
Large bowl
container to store you soymilk
 Put the soybeans into a large bowl and cover them with lots of water. Leave them to soak 8-10 hours or overnight.
 Once the beans have soaked and roughly doubled in size strain them and place them into a blender with about 1 cup of water (You may need to do this in several batches if you have a small blender like me). Blend the bean/water mixture until a paste forms. It should look like a bean dip.
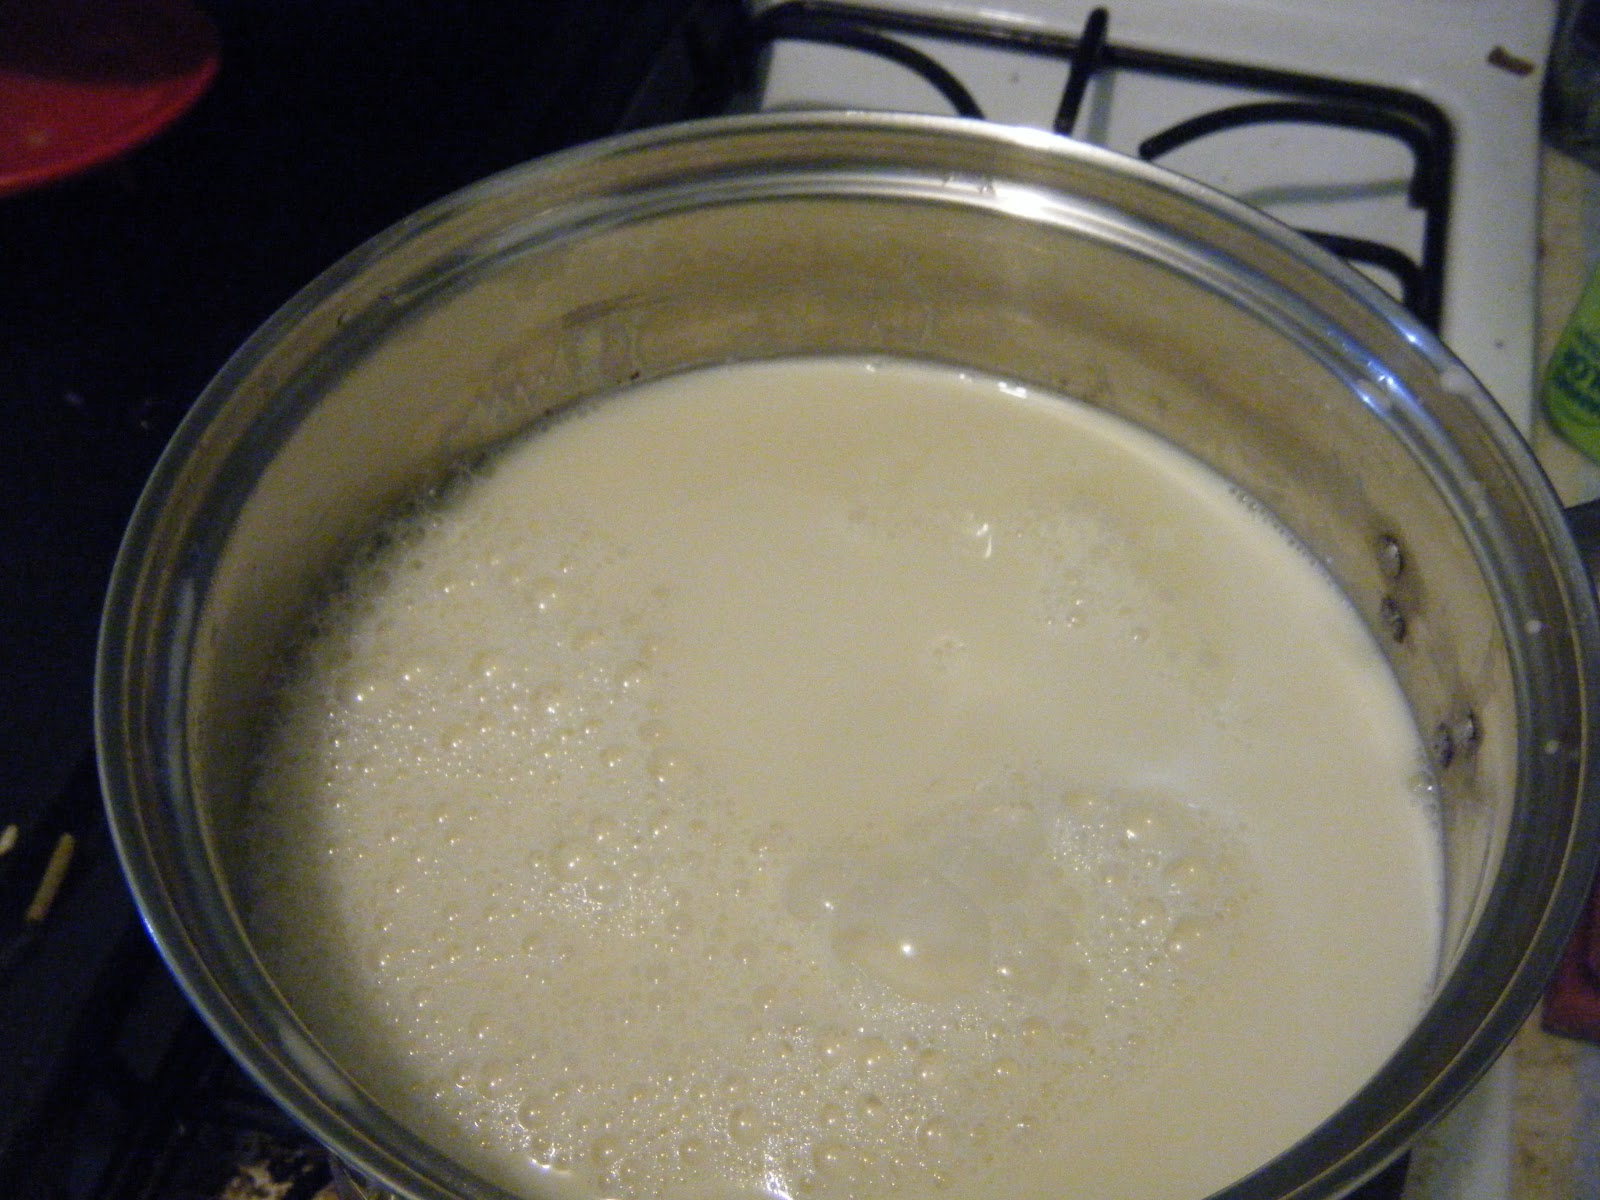
 Pour your bean goop into a pot and add 2-3 cups of water depending on whether you like a thicker, creamier soy milk or a thinner one. If you're not sure how thick you want your soymilk add 2 cups of water now and later on when I say you can add more water. On a medium setting cook the beans/water mixture just until it starts boiling. Make sure to keep stirring the mixture as it will burn to the bottom of the pot very quickly.
 At some point while the bean/water mixture is cooking or before if you're super organized you need to set up your straining station. Place a thin towel or pillowcase over a strainer and place the strainer into a bowl.
 Once the mixture comes to a boil turn off the stove and pour it into your strainer/pillowcase setup. Close the pillowcase (or whatever you're using) and sqeeze all the liquid out. You can use a potato masher, spatula, your hands or whatever else you want (make sure to wear a silicone glove if using your hand!) Squeeze, twist, press, do whatever it takes to get all the liquid out. Once you have squeezed out as much as you can open the pillowcase and add about 1/2 a cup more water, stir and squeeze one last time.


After all the squeezing you should be left with a solid/flaky lump (left) and a nice milky liquid (right). Save the lump, called Okara, I'll show you what to do with it later. Pour the soymilk back into the pot.
 At this point if you find your soymilk to thick for your liking you can add more water, Add water 1/2 cup at a time until you get your disired consistancy. On a medium high heat bring the soymilk to a boil (be careful, it acts like milk and will boil over if you're not paying attention!). Reduce heat and simmer for 10-15 minutes or until the beany aroma and taste are almost gone. (Hint: Try the soymilk before boiling so you have a reference point)
 Once you have achieved the less beany taste you want you can add sugar, syrup or any other flavorings that you choose. I personally love adding vanilla flavoured syrup to my soymilk. Pour it into a container and store in the fridge for a couple of days. Remember since it has no preservatives you need to use it up fast!
Congratulations! you've just made soymilk!!
Now what to do with the dry, flaky okara that I told you to put aside.....
Tools needed:
Baking sheet
tinfoil (optional)
Something to prop the oven door open a bit
 Remember this?
 Spread it out evenly on the lined baking pan. Crumble and flake the okara as best as you can.
 Put it into the oven at the lowest setting to dry. I prop my oven door open an inch or two because my oven doesn't go low enough. Dry the okara. After about 15-20 minutes give it a stir using a spatula or fork or whatever. It will have stuck to the tinfoil a bit, don't panic, that's normal, scrape it up and stir it up. Continue drying it until it is totally dry.
Remove it from the ove and let it cool, then dump it into an airtight container or ziplock bag and store in your freezer.
Now, you may be asking me "what do I do with this dried okara?" Well it's rather simple and neat really.
Next time you bake anything (bread, muffins, cookies, loafs) replace 1/3 of the flour with okara! Place the okara into a blender and blend it so that it is the consistancy of flour and simply treat it like flour. It doesn't change the taste of your food at all (similar to tofu) but adds a whole bunch of protein!!
Seriously try it, it's awesome!
Ingredients:
1 Cup dried non GMO, organic soy beans
Water
Tools needed:
Pot
Strainer
clean but old dish towel or pillow case
Large bowl
container to store you soymilk


After all the squeezing you should be left with a solid/flaky lump (left) and a nice milky liquid (right). Save the lump, called Okara, I'll show you what to do with it later. Pour the soymilk back into the pot.

Congratulations! you've just made soymilk!!
Now what to do with the dry, flaky okara that I told you to put aside.....
Tools needed:
Baking sheet
tinfoil (optional)
Something to prop the oven door open a bit


Remove it from the ove and let it cool, then dump it into an airtight container or ziplock bag and store in your freezer.
Now, you may be asking me "what do I do with this dried okara?" Well it's rather simple and neat really.
Next time you bake anything (bread, muffins, cookies, loafs) replace 1/3 of the flour with okara! Place the okara into a blender and blend it so that it is the consistancy of flour and simply treat it like flour. It doesn't change the taste of your food at all (similar to tofu) but adds a whole bunch of protein!!
Seriously try it, it's awesome!
Subscribe to:
Comments (Atom)